Module 3 • Lesson 1💎 Beauty Pipeline — Micro D&B & Color Zones
The Intermediate course got you a natural finish. Agency beauty goes further and slower: evening skin at the pore level with micro dodge & burn, and unifying the face's color zones so the whole complexion reads as one even, luminous surface. This is patience made visible.
📚 What You'll Learn
By the end of this lesson, you will be able to:
- Run the full beauty order: clean → frequency separation → micro D&B → color zones → finish
- Even skin with micro dodge & burn — hundreds of tiny corrections, not a blur
- Find uneven color zones with a high-saturation check layer
- Unify hue and luminance across forehead, cheeks, and chin
- Know where beauty retouching crosses from flattering into dishonest
⏱️ Estimated Time: 60 minutes
🎯 Project: A portrait taken to agency-beauty skin — even tone, even light, real texture — with a written pass order.
In This Lesson
👤 The Goal: Even, Luminous, Real
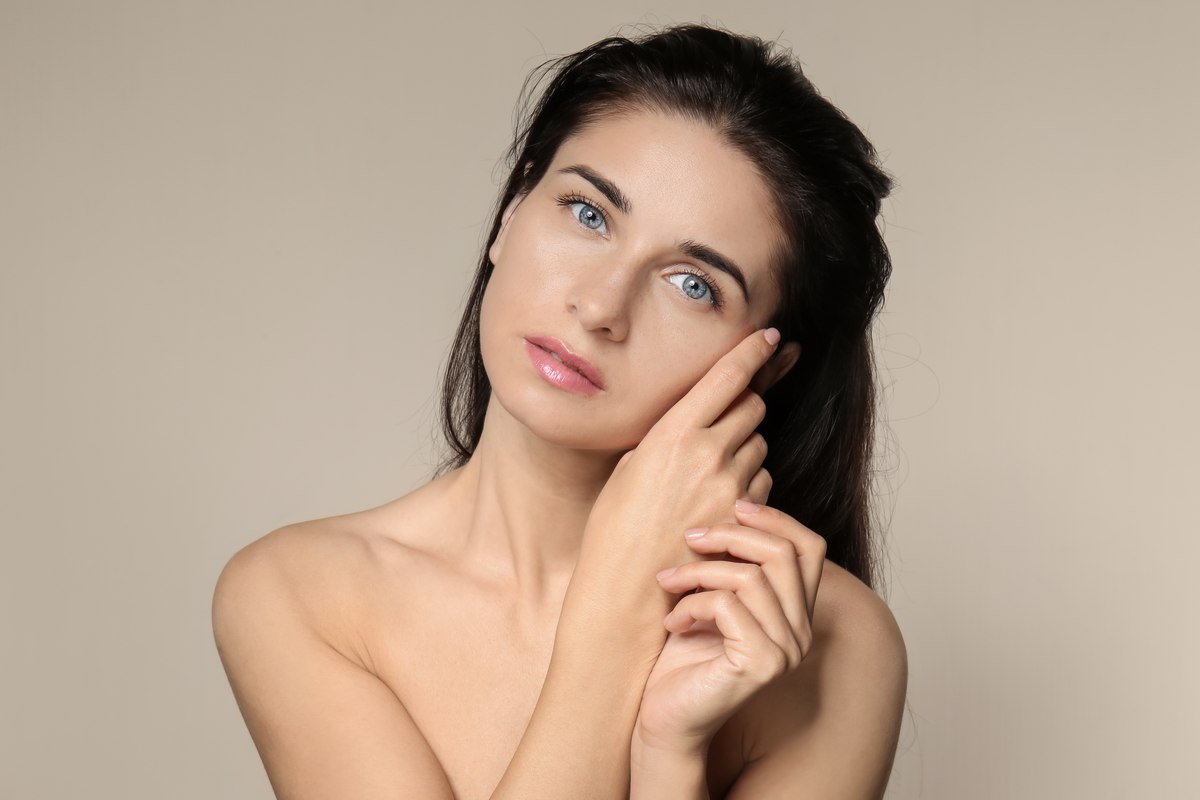
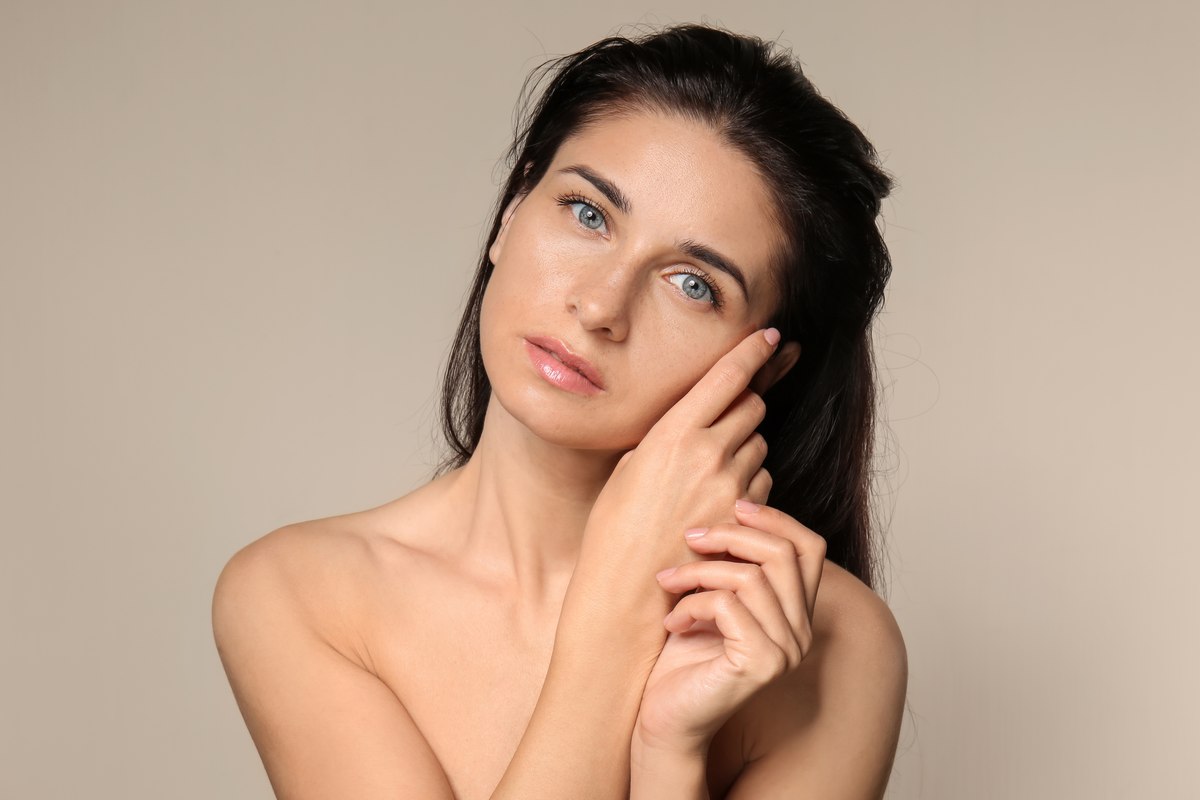
On the right, a natural capture — pleasant, but with blotchy tone, uneven light across the face, and a few distractions. On the left, an agency-beauty pass: the complexion is even and luminous, the eyes and lips lifted, the texture entirely intact. It still looks like her, on a very good day. Drag the handle:
🧠 Mental Model: Even the Transitions
Amateur smoothing removes texture; agency retouching removes unevenness and keeps texture. Skin looks blotchy not because the pores are wrong but because the transitions between light and dark, and between color zones, are irregular. Fix the transitions and the skin reads flawless while every pore survives.
That's two separate jobs. Micro dodge & burn evens the luminance — it lightens the little dark blotches and darkens the little bright ones until light flows smoothly across the skin. Color-zone unification evens the hue and saturation — the forehead often runs warmer, the cheeks redder, the chin cooler; you pull them into one family. Neither touches texture.
🖌️ Micro Dodge & Burn
Micro D&B is the Intermediate course's technique at a finer scale and far more patience. On a 50% gray Soft Light layer (paint white to dodge, black to burn) or on a pair of Curves dodge/burn layers, zoom to 100% and, with a tiny 1–3% flow brush, lighten each small dark spot and darken each small bright one — one blemish shadow, one oily highlight at a time. You are hand-flattening the luminance map of the skin, blotch by blotch.
⚠️ This is measured in hours, and that's correct
A real beauty D&B pass on a cover shot can take a serious chunk of a day. That's not inefficiency — it's the job. If you're tempted to "just blur it", you've left beauty retouching and gone back to a filter. The value is in the patience.
🎨 Color-Zone Unification
To see color zones, add a Hue/Saturation check layer with Saturation pushed to about +60 to +80. It exaggerates every place the hue drifts warm, red, or cool, and the patchwork becomes obvious. Toggle it on to diagnose and off to judge. (A flat skin-tone fill in Color or Hue mode does the opposite: it evens hue, so it is a correction tool, not a check.) Then, on masked Hue/Saturation or Color Balance layers, nudge each zone toward a single target: warm the cool chin, calm the red cheeks, cool the hot forehead, until the whole face is one hue family.
✅ Unify luminance and color, never texture
The entire beauty philosophy in one line: fix the two things skin gets wrong — uneven light and uneven color — and refuse to touch the one thing it gets right, texture. Every tool here (micro D&B, color zones, frequency separation) exists to honor that split.
🛠️ Guided Build: The Beauty Pass
Open a clean, well-lit portrait. Do global corrections (Module 1) first.
Step 1: Clean, then separate · 10 min
- On a new empty layer, remove temporary blemishes with the Spot Healing Brush (tick Sample All Layers) or the Healing Brush set to Sample: Current & Below (leave permanent marks such as moles and scars). Build a frequency separation for any remaining tone/texture work.
Step 2: Micro dodge & burn · 20+ min
- Add two Curves adjustment layers: Dodge with the midpoint raised about one stop, Burn with it lowered. Invert each mask to black (Ctrl/⌘+I). (Or use one 50% gray Soft Light layer instead.)
- Add a Black & White adjustment layer on top as a check layer.
- At 100%, with a soft white brush at 1–3% flow, paint on the Dodge mask over small dark blotches and on the Burn mask over small bright ones. Toggle the B&W check constantly.
Step 3: Unify color zones · 12 min
- Add a Hue/Saturation check layer (Saturation +60 to +80) to expose the zones, then hide it. On masked Hue/Sat or Color Balance layers, pull forehead, cheeks, and chin into one hue family, re-checking with the saturation layer.
Step 4: Finish & temper · 8 min
- Group everything and pull the group's opacity back a touch so it stays human. Delete or hide the check layers. (The eyes, lips, and hair get their own pass in Lesson 3.2.)
- Save as
beauty_skin.psdwith all layers. Lesson 3.2 continues on this file. 🏆
✅ Project Completion Checklist
- ☐ Blemishes cleaned; frequency separation built
- ☐ Luminance evened with micro D&B at 100%, 1–3% flow
- ☐ Color zones exposed with a check layer and unified
- ☐ Texture fully intact at 100%
- ☐ Effect tempered with group opacity, still recognizably them
- ☐ Saved as a layered
beauty_skin.psdfor Lesson 3.2
🧗 Now You: Solo Variation
🌟 Your challenge
- Retouch the same face for two markets: a natural editorial and a polished cosmetics ad. Same skin, different amount — learn the range.
- Do a full micro D&B pass in Black & White only, revealing color at the very end. Working blind to color sharpens your luminance eye.
- Time yourself, then do it again slower. Beauty rewards the second, patient pass far more than the first.
Going further: study a real high-end beauty retoucher's before/afters and identify the color zones they unified. The moves become obvious once you know to look for zones.
🍳 Recipe Card: Beauty Skin
Even the light and the color, keep the texture
- Clean blemishes → frequency separation
- Micro D&B: 100%, 1–3% flow, even every blotch; check in B&W
- Color check (Hue/Sat, Saturation +60 to +80) to expose zones
- Unify forehead / cheeks / chin into one hue family
- Temper with group opacity; save for the features pass
Mantra: flawless skin is even light and even color — never a blur.
📓 Learning Journal
Add to your journal after this lesson:
- Key concepts you learned
- Techniques that clicked for you
- Questions or confusion points to revisit
- Ideas you want to try
- Your progress and feelings about learning this
✍️ This lesson's prompt: How did it feel to spend real time on micro D&B versus reaching for a smoothing shortcut? Name what the patience bought you that the shortcut couldn't.
📝 Lesson Summary
🎓 Key Takeaways
- Agency skin removes unevenness, not texture. Blotchiness lives in the transitions.
- Micro dodge & burn evens luminance, one tiny blotch at a time, at 100% and 1–3% flow, judged through a Black & White check.
- Color-zone unification evens hue and saturation; a high-saturation Hue/Sat check layer exposes the zones.
- Temper the whole pass with group opacity so the person stays recognizably themselves.
🎉 What You've Accomplished
You took a portrait to even, luminous skin while keeping every pore, and you wrote down a pass order you can repeat. That combination of patience and restraint is what separates agency beauty work from a smoothing filter.
❓ Common Questions at This Stage
Micro D&B or frequency separation: which for skin?
Both, for different jobs. Frequency separation fixes discrete problems (a blemish's color, a blotch) fast. Micro D&B evens the continuous luminance transitions that make skin read as blotchy. High-end work uses D&B as the backbone and frequency separation for spot cleanup.
When is beauty retouching dishonest?
Evening tone and light is universally accepted; reshaping bodies or erasing identity is a real ethical line, especially for young audiences. Keep the person recognizably themselves and be transparent with clients. Skill doesn't remove responsibility.
🔭 Looking Ahead
Skin is the largest surface; the features are the hardest. Next: Lesson 3.2: Hair, Lips & Eyes at Agency Standard, the small, high-scrutiny areas where a beauty image is won or lost.
✅ Before the Next Lesson
- Save
beauty_skin.psdwith all layers; Lesson 3.2 opens it. - Write your pass order down as a checklist.
- Write your Learning Journal entry.
📚 Additional Resources
🌟 Encouragement for the Journey
If your first micro D&B pass felt endless, that is normal; it is the job, not a sign you are slow. Each pass trains your eye to see smaller unevenness, and the speed comes with it.